
I don't have any fancy backdrops or anything when I have white backgrounds in my pictures. I have taken pictures of exactly what I do to help you better understand the exact steps I took to accomplish my blue glass/strawberry picture.
First of all, it takes me quite a few tries and adjustments till I get it right. I wish I could say I know what settings to use right off but many times it's trial and error and I just keep making adjustments till I get it right. Please forgive the ugly colors in the kitchen. I live in an apartment so we are stuck with what they provide.
I took the picture in my kitchen at night under the fluorescent lighting that is provided. That's how most of my pictures with the white backgrounds are taken. Many times I am running around late at night trying to get my picture taken and posted before 10:00. I adjusted my in-camera white balance to 'day white fluorescent' so the lighting wouldn't appear too blue or too yellow. I have several options for my white balance so I try each one and snap pictures until I find the one that looks best. The picture below is where it all went down. :)

I used several sheets of regular computer paper. Enough sheets piled together so you can't see through them. I laid them up against the stove with some on the floor and some up against the stove to provide a white base and white background. Crazy, huh? I know!

To get the top papers to stay up without falling I had to put a little bit of scotch tape on it and stuck it to the bottom part of the stove. You like my fancy shmancy photography equipment?

Then I set the blue glass to one side of the paper and filled it with ice, clear flavored water and then cut a slit in the strawberry to get it to stay on the side of the cup.

Then I got down low and snapped from all different angles till I found an angle I liked which resulted in the final picture. I took at least 10 shots.
I shoot in manual/RAW. These were my settings for the picture I took: ISO800 62mm f/5.3 1/40 sec
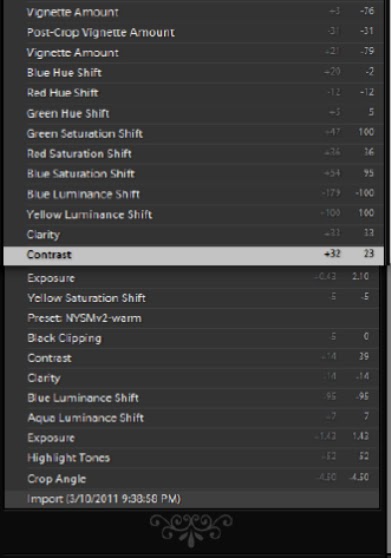
Then the editing begins. I use LR only. It's the only editing program I have and the only program I have learned to use so far. I know there is a lot I haven't even learned to use yet but I work with what I know. The edits may seem to be all over the place but I just move and adjust till I get the result I want. Starting from the bottom moving up shows all the edits I made.
or


If it wasn't for Lightroom I wouldn't really have many great pictures to post. Thank God for editing programs. I'm sure you will never view my pictures the same way again. lol Here is the after again for a comparison:

I think that pretty much sums it up. It seems like more work than it actually is. I just drag around my settings back and forth, back and forth till I get what I like. Hope this was an understandable tutorial. I've never done one before but I tried to make it as simple as possible. If you have questions, I will do my best to answer them in another post.
Thanks for your patience and interest. My stomach is now officially in knots. It's humbling to be paid such high compliments. I appreciate all your comments.
28 comments:
oh wow! I love your pictures even more. Great job taking and editing them :) Looking forward to seeing your pictures the rest of the year :)
Excellent tutorial.I believe that part of the joy of photography,at least for me ,is the editing part.I enjoy editing and playing with my images almost as much as shooting them. Lightroom is a program I don't have,but have been told it is great.Again,thanks for sharing these steps and keep on having fun with it.
Thanks for sharing your secrets with us...that image really turned out awesome. You crack me up for being so nervous...I am always looking forward to your blog to see what you post next!
Ah, thanks for sharing.
Thank you, thank you, thank you! My hat is off to you for doing something out of your box, and I have to tell you, I for one am so thankful for all you shared. First, I love seeing how others come up with things and it makes me realize that many of us are walking down the same path. I had a revelation the other day that what we do is about 60% the shot and about 40% what we do with it on the computer. PPing is truly an artform and a part of what we have to do to get to where we want to be. It makes me appreciate film photographers even more now because even though they could get creative in the darkroom, they had nothing available to them like we do now, so they had a lot more pressure to get the shot right in camera. Second, you're right, I'll never look at one of your pictures the same, because when I do now, I'll think of the generous, kind hearted person who was willing to take their time to share their talent with me in an attempt to help me become a better photographer and processing artist. In by book, you ROCK! Thank you.
Thanks for your step by step tutorial on how you achieved the wonderful strawberry water photo. Shooting in raw gives so much more latitude to how the photo can be developed.
I think this is great and *to me* it only proves that we don't really need fancy materials to get these great shots!
I agree, thank God for editing programs :) It is humbling to tell how simple my process is and how I'm not a pro but I think people like it more b/c it gives them a chance to do it :)
That drink look so refreshing
This is a GREAT tutorial. You did wonderful job, thank you so much for sharing your creativity.
I agree with many of the comments above. This revelation makes your pictures that much more beautiful and interesting. Thanks for taking the risk to share your knowledge and experience.
Thanks for the behind the scenes look! I love seeing how people set up/shoot/process their photos.
thanks for all of the details - the shot came out really well. Have you tried white foam board instead of computer paper? You can buy some at places like Staples fairly cheaply.
Great post. I forget that a white backdrop could be as easy as paper. I end up taking pics with whatever backdrop there is which sometimes doesn't turn out so well. Great tutorial & great picture!
Great shot! Love the tutorial!
Great tutorial! It lets people know they don't need tons of fancy equipment to take great pictures.
Great tutorial! I think you'd be surprised at what other photographers (myself included) use as their "studios" also. White poster boards, aluminum foil, etc. propped up in front of a window for some natural lighting. Just shows that you don't need to spend a lot of money to take good photographs.
Your photo is great!
Thanks for stopping by my blog today!
Thank you for the tutorial... I could understnad it!!! If it had been some lengthy, fancy schmancy professional jargon and equpment I can't afford, I would have been discouraged. Instead, I'm thinking, "Maybe I can do that!" As far as editing goes, it is as important as what comes out of the camera.
Great Photo and explanation on how it was done.
Wow! Cool! I have never heard of Lightroom, is it fairly easy to use or will I have to have a college degree in it to figure it out! LOL
I have photoshop but never sat down to figure that out either, I wonder if photoshop will allow me to do that too?
Very helpful thanks!
i love what kristin said ^^^ about never looking at your photos the same...I'll think of the generous, kind hearted person who was willing to take their time to share their talent with me..."
amazing! what you did! and more than that is how you made me FEEL. i do not understand the camera settings and never heard of LR, but you shared like the famous cook in the movie "ratatouille" *teehee* who would say that ANYone can learn to cook. yeah. maybe someday, i can take pictures too. now that's a good tutorial. :)
This is a really wonderful thing you have done, and I thank you for stepping out of your comfort zone. It's really interesting to see how other people set up their shots and to recognize some of the similar things we have in common. I too, have used sheets of paper as a backdrop (nothing wrong with that!) and I also play around in photoshop elements to get the look I want. Thanks again!
Well done I am sure it will be better than mine! I am feeling the pressure about the water one :-0 Also very humbled too :-)
Thanks so much for posting this. I really love your work- you are so creative. I have wanted to shoot in RAW for a while now. You've inspired me to give it a try! Keep posting that great work! :)
This was great!! I love tutorials like this, very easy to understand. Your photos are great! Thanks for sharing!
I wish I knew about Lightroom before I bought Photoshop.
I was just saying to my husband the other night, "Photo editing is like a push up bra, it only enhances the beauty." :)
I really seriously appreciate you taking the time to do this!
I love to see other photographers like me! I don't have much equipment either and do the same thing that you do for backgrounds! Keep up the good work!
Post a Comment